1. In Part 1 of this Guide to creating Visual Aids, we categorized visual aids into three groups:
Public—to communicate anonymously with people in a crowd
One to One—to communicate with one person
Me—to communicate with myself
2. In Part 2 we analyzed 3 most important elements of creating visual aids:
The problem we want to solve with our visual aid.
The message we want to communicate.
The type of image that can best represent that message.
3. Now we will continue by answering three additional questions which are crucial to take our visual aid to the next level:
Who is the specific receiver of your message?
Is there a middleman between you and the receiver?
Who will finance the project?
Answering these questions will help us establish if creating this visual aid would be possible because even our best ideas and intentions have to pass the logistics and finances.
My process of creating a visual aid
I will use a visual aid that was designed for seniors living in a senior residence, where the language barriers are one of the reasons people feel isolated and physically not as active as they could be.
Originally it was supposed to be a visual exercise guide for Senior Immigrants I worked with but during the development of this visual aid I learned that not only Senior Immigrants would benefit from it, but all seniors regardless of their background.
One of the seniors who lived in a residence pointed out that the easiest way to reach all seniors with such a visual exercise guide would be to install it on the hallway walls of the senior residence because they use hallways for their walking routine.
But in order to do that we need to involve the management of the residence, obtain permission and address all possible obstacles.
To design the visual aid for seniors, I went through all three parts several times researching, photo-shooting, consulting with a registered kinesiologist, residence manager and testing each exercise with the seniors.
Who is the specific receiver of your message? —A senior resident who may not have knowledge of how to exercise or may not have access to any resources.
Is there a middleman between you and the receiver? —Yes. The manager of the residence.
Who will finance the project? —All involved invested mostly time as volunteers.
1. Choose 1 of the 3 groups to categorize your visual aid (Part 1). Since our visual aid was for a large group of people, we kept in mind the public.
Public
One to One
Me
2. Analyze 3 most important elements in creating a visual aid (Part 2).
The problem we want to solve with our visual aid— A lack of physical activity and social isolation among seniors living in a senior residence.
The message we want to communicate—Keep physically and socially active.
The type of image that can best represent that message—Illustrations, interactive art, posters.
3. Answer 3 critical questions in creating a visual aid (Part 3).
Let’s go deeper going through these steps again.
Repeat the process
1. Choose one of the three groups:
We established it is Public—large group of unknown people.
2. Analyze three most important elements:
The problem—Research existing resources for seniors’ physical activity.
The message—Show visually how to keep physically and socially active.
The type of images—Test different types with seniors: illustrations, interactive art, posters…
3. Answer three critical questions:
Who is the specific receiver of your message? —A senior resident who may not have knowledge of how to exercise or may not have access to any resources.
Is there a middleman between you and the receiver? How are we going to reach the seniors? —We need to reach the management of the residence, not seniors. The manager is our middleman.
Who will finance the project? —All involved invested mostly time as volunteers, including the manager who could be a partner in creating this visual aid.
How to choose the format
The objectives of the receiver and the middleman are different and they both have to be met. Even though at the first glance you may think all we need is a practical visual aid. However, everyone has a different definition of practicality.
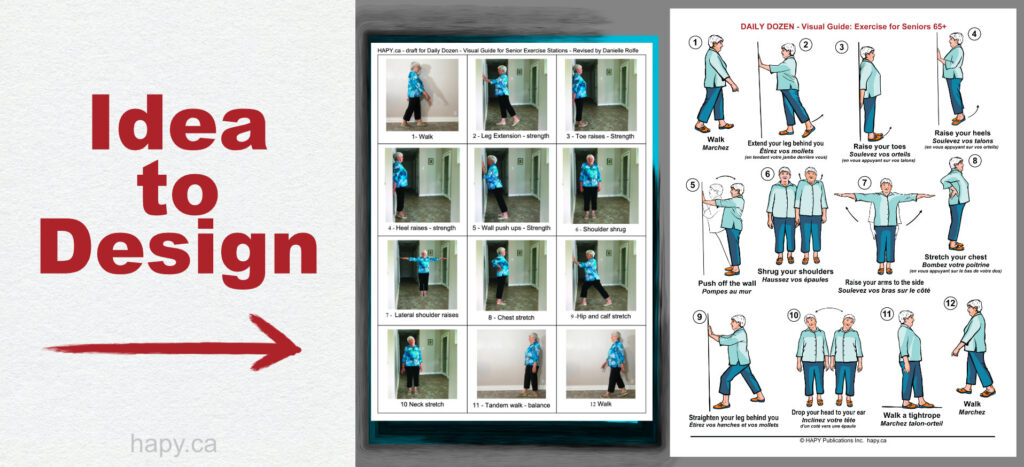
It needed to be done in more than one format to make sure it could serve all parties involved. I called this visual aid Daily Dozen: Visual Exercise Guide—for Seniors 65+. It was inspired by the Canadian Physical Activity Guidelines for Older Adults – 65 Years & Older which was available only online and only to those who would be able to search for it and who would be able to read it because it did not contain any graphics. I found it on the website of CSEPguidelines.ca.
Summary
If you are ready to create a visual aid to solve an existing problem here are the steps:
1. Choose one of the three groups to categorize your visual aid:
Public
One to One
Me
2. Analyze three most important elements in creating a visual aid:
The problem you want to solve with your visual aid.
The message you want to communicate.
The type of image that can best represent that message.
3. Answer three critical questions in creating a visual aid:
Who is the specific receiver of your message?
Is there a middleman between you and the receiver?
Who will finance the project?
You can go through these steps several times and go deeper each time until you reach the level of satisfaction.
This time, we will analyze three most important elements of creating visual aids.
Elements of an effective visual aid
Creating a visual aid doesn’t depend so much on your ability to draw. You can use props, photos or illustrations and graphic design.
An effective visual aid depends on the analysis of three elements:
The problem we want to solve with our visual aid.
The message we want to communicate.
The type of images that can best represent that message.
Let me explain what I mean with some examples.
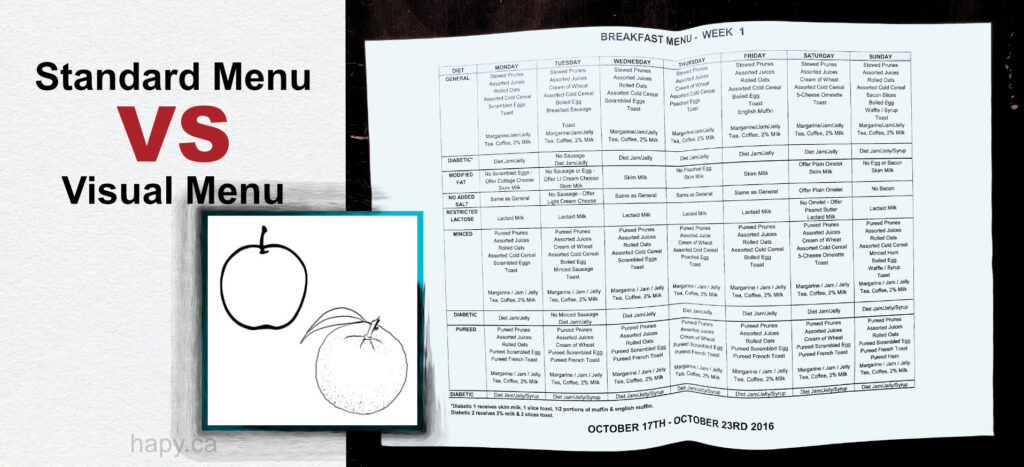
Example 1: Standard menu VS visual menu
The problem we want to solve with our visual aid—Someone can’t read a menu.
The message we want to communicate—Choose what you want to eat.
The type of images that can best represent the message—Objects—like in a menu or product lists.
It could be especially effective in nursing homes and hospitals that have a problem of communicating with patients and food wasted because of that. The message on their menu is simple: make a choice of what you want to eat but many people can’t read the menu and don’t make any choices. In these situations, there is only an option of a default meal, which may not have been people’s choice had they understood what their options are.
This example was inspired by one of the local nursing homes. Their menu is printed on a large sheet of paper filled with small text that looks like a document. It is basically impossible for many people to read it.
Instead, if people were provided a simple choice between just two items but in a visual format, the possibility of them choosing one would increase.
Standard menu VS visual menu – hapy.ca – Iwona Buziak-Mohamed
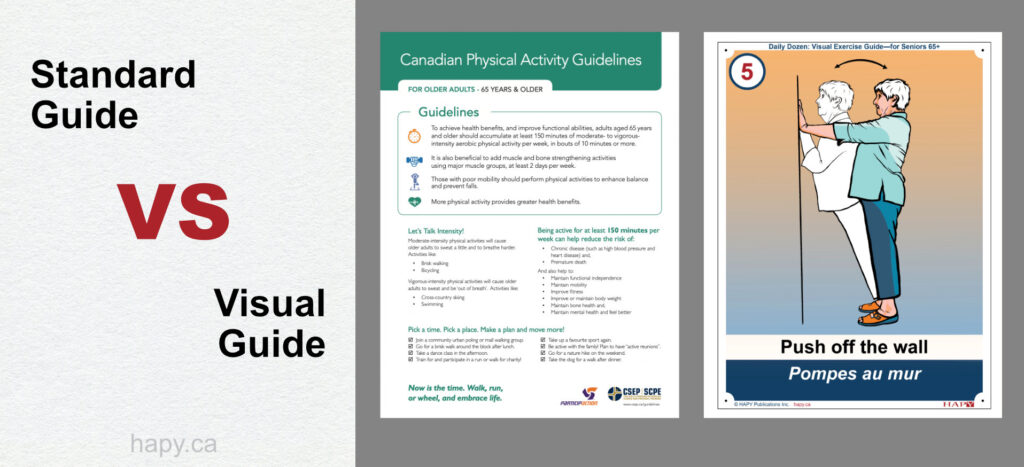
Example 2: Standard guide VS Visual guide
The problem we want to solve with our visual aid—Physical inactivity and social isolation among seniors in a senior residence.
The message we want to communicate—Exercise.
The type of images that can best represent the message—Narrative image-breaking action into steps.
It can be installed it on a wall such as a senior residence hallway wall and be available every time a person passes by to increase the possibility of interaction.
This project was inspired by the Canadian Physical Activity Guidelines for 65+ which did not have any graphics to explain their suggested exercise routine.
A visual aid containing narrative images is more complicated because it has to show action but its use can be very effective.
Standard Guide VS Visual Guide – hapy.ca – Iwona Buziak-Mohamed
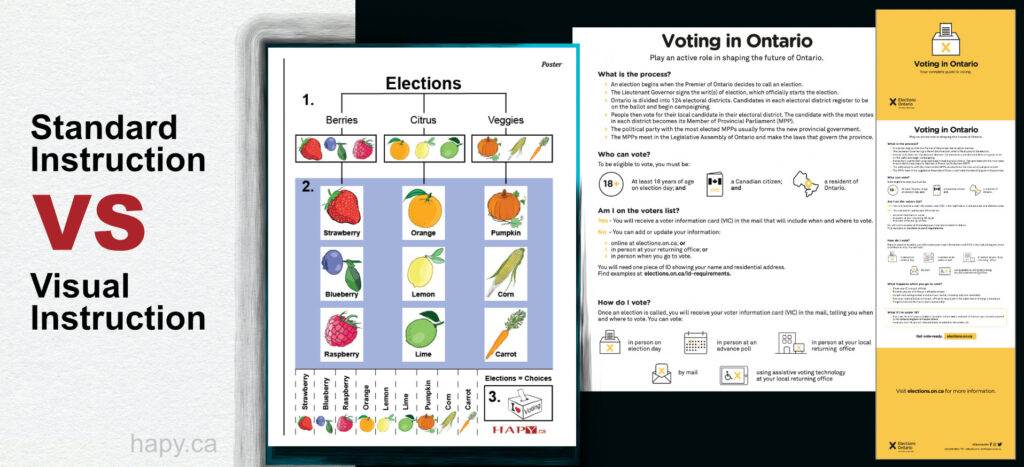
Example 3: Standard instruction VS Visual instruction
The problem we want to solve with our visual aid—how to explain an election to seniors with language barriers.
The message we want to communicate—you can vote, you have a choice.
The type of images that can best represent the message—a poster with a part that can be cut into ballots.
Just like in the first example, it is about a choice but this time it is more complicated and abstract, so it is harder to create a visual aid. In abstract ideas it may seem difficult to point out the essence, but once you do, it is easy to suggest an image type.
The best image type to explain the concept of an election to our community members is a series of familiar objects in a poster. We have three categories of food with three representatives in each group. We use fruits and vegetables to explain the options to choose from in a way that can help tell a visual story rather than facts.
At the end of the poster there is a section to cut a ballot and cast a vote. It is a good way to interact and have a winner too.
An abstract idea may look like the most difficult of the three but if you dig deep into the essence of your message you will find out that it is not different than the previous ones. Then you can use objects, narrative images or a mix to create a visual aid that can help you communicate your message.
Standard instruction VS Visual instruction – hapy.ca – Iwona Buziak-Mohamed
Summary
To recap, we need to analyze:
The problem we want to solve with our visual aid.
The message we want to communicate.
The type of an image that can best represent that message.
Examples used
1. Object
apple and orange from the ESL for Seniors as an example of a visual aid in use
Many people don’t know how to create a visual aid. So let’s talk about visual aids. First, let’s ask a few questions:
What is a visual aid?
Why do you need one?
According to a dictionary, “a visual aid is an item of illustrative matter such as film, slide or model. Why do you need one? To supplement written or spoken information so that it can be understood more easily.”
I would add from my own experience learning the language, it can be any physical object that can help you show what you are talking about. It can be made or found ready.
How to choose a visual aid
The answer is: be clear who your visual aid is for and the rest will follow depending on how fast you need to send your message, how much you are willing to spend on creating a visual aid or does it make sense to invest in creating a visual aid if there is one on the market.
How to categorize visual aids
You can categorize visual aids in many different ways, but for the purpose of this exercise I categorize them by three groups which have to do with people I aim my message for.
Public—to communicate anonymously with people in a crowd
One to One—to communicate with one particular person
Me—to communicate with myself
Let me tell you about each of these groups.
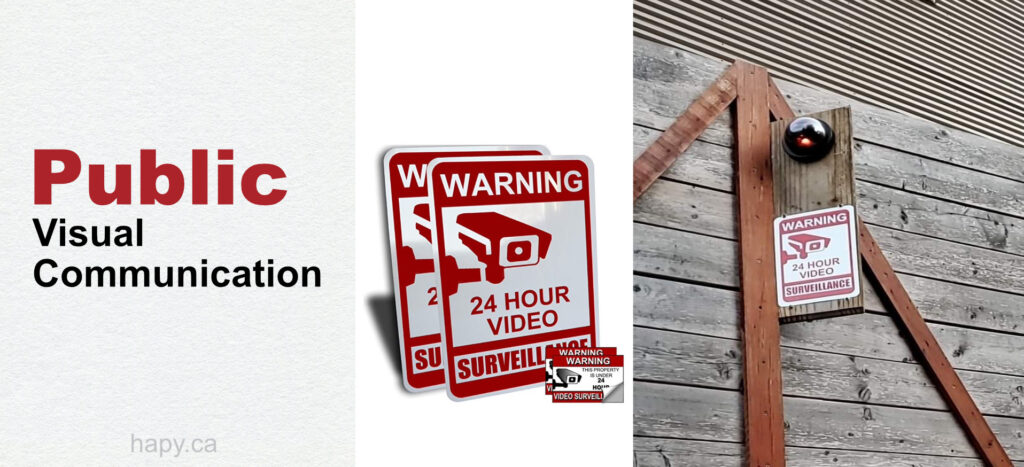
● Public
I call a “Public Group”, a crowd that can pass by and I don’t know these people but I need to communicate my message to them. They actually could be speaking the same language as I but, using a visual aid makes perfect sense instead of trying to talk.
One summer I was challenged by a couple of thieves who were stealing from my property. It made me feel watched and unsafe. I had to figure out how to communicate with them so they could stop coming back, but I didn’t know who they were. Anyone passing by could be them.
So I installed a sign outside saying: 24-hour video surveillance and a camera and they stopped coming. I think the sign and a camera worked well as my visual aid.
Creating visual aids – Part 1 – Public Visual Communication – Iwona Buziak – hapy.ca
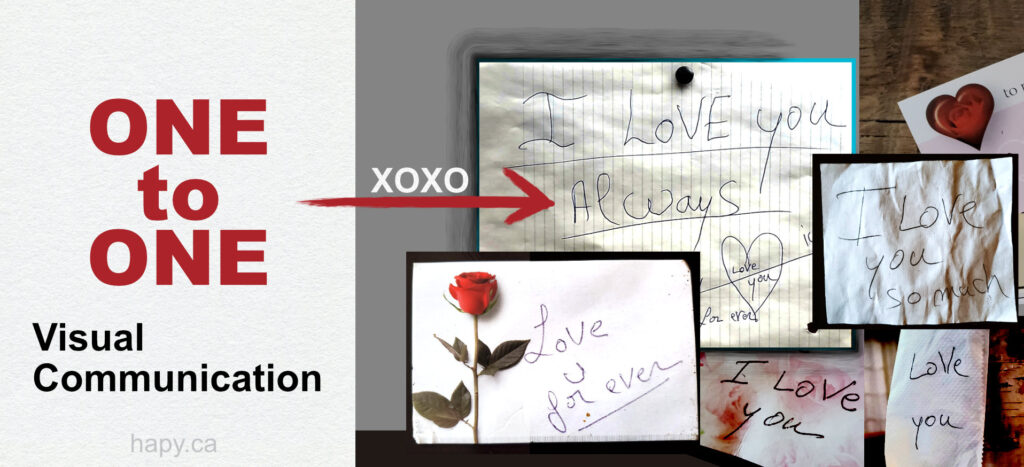
● One-to-One
I call a “One-to-One group”, a couple of people who communicate using visual aids that are meant only for them. It could be a note, a postcard, a sign that only they understand.
My husband writes me a lot of love notes and doodles hearts and arrows on them. They are always around the house. I know they make us look like a couple of third graders in love. But he makes these notes for me to make sure I remember he loves me and also they make both of us feel good.
The visual aid here doesn’t need to exist, but we chose to communicate visually as a part of building our relationship in a fun way.
Creating visual aids – Part 1 – One to One – Visual Communication – Iwona Buziak – hapy.ca
● Me
I call a “Me Group” a group that only I belong to and the visual aids I can use for myself as reminders, or memories, for example.
The summer I had been targeted by thieves, most of my days I worked outside the house so I could watch the neighbourhood. To have a reason to stay outside all day every day for at least a week, I took on the project of fixing the body of my car. I felt a lot of negative energy caused by the thieves coming to my property so I needed a boost of positive energy.
I used my Toastmasters paper notes and taped them to separate the areas I needed to fix on the car. It was a great visual aid. Not only did I recycle the paper, it reminded me of what I was learning and it made me smile too.
Creating visual aids – Part 1 – Me Visual Communication – Iwona Buziak – hapy.ca
Summary
When you deal with life challenges, usually you don’t have any doubt what visual aid can help you communicate your message. As long as you know who it is you want to address your message to whether it is:
Public
One-to-One
Me
You will figure out a fast way to create a strong visual aid.
“The eyes have one Language everywhere” (English Proverb)
It means that no matter what language you speak, when you see a picture, you can interpret the information much easier than words.
Language barriers
Language barriers are the # 1 obstacle in communication for immigrants. These barriers isolate people from the community and services/programs that would be available to them. Not being able to communicate may become time-consuming and frustrating for both the individuals assisting immigrants and for immigrants who don’t speak English or French.
Despite the efforts of individuals and organizations to ease the communication—there is still room for improvement. One way to do this is by using more visual communication tools. There are many benefits to using pictures instead of words.
Pictures to communicate
Using pictures to communicate is nothing new to people.
Pictures:
Are easy to understand
Save time and resources for caregivers
Give more independence to those who can’t speak English or French
My father’s story
My father immigrated to Canada when he was older. He learned enough English to be able to work and support himself and his family, and yet he could barely hold a conversation… Before passing away he spent over a year in the hospital and eventually a nursing home. One day I went to visit him while the nurse was trying to talk to him. Within minutes she became louder and louder—and he became more frustrated. He wasn’t deaf—he just couldn’t understand her.
Had the nurse showed him a simple picture—the whole conversation would have been more timely and pleasant.
What about you?
Do you know someone who is isolated because of a language barrier?
Use visual cues when communicating with individuals that have a language barrier. Avoid speaking louder if the person you are talking to can’t understand what you are saying. Let the pictures do the talking.
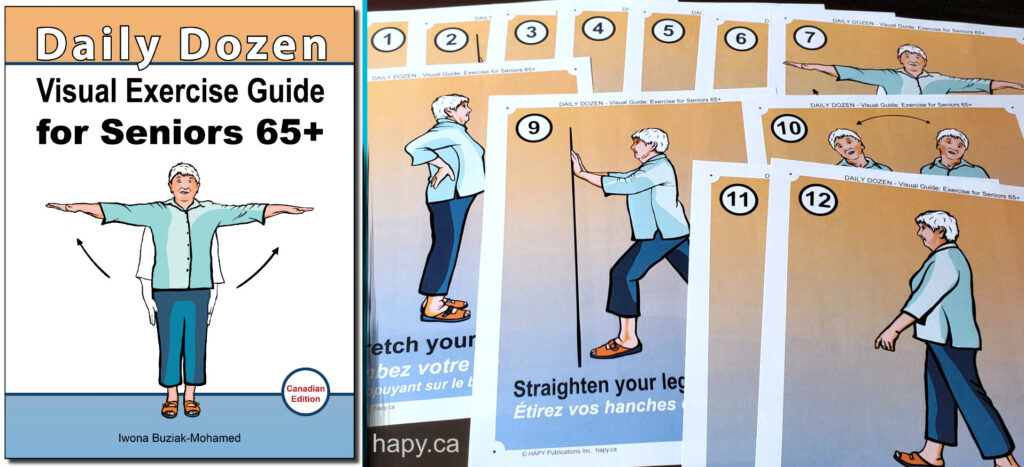
The Creative Journey of a visual aid I called Daily Dozen: Visual Exercise Guide—for Seniors 65+ began with a problem of social isolation and physical inactivity among seniors. This Creative Journey took many steps and curves along the way but there were three milestones I want to share with you.
1. The first milestone was research—we wanted to know why there was a problem, what solutions were available and how we could fix it. Most of the resources we found were available only online in a written form so seniors with language barriers would not be able to access or use them.
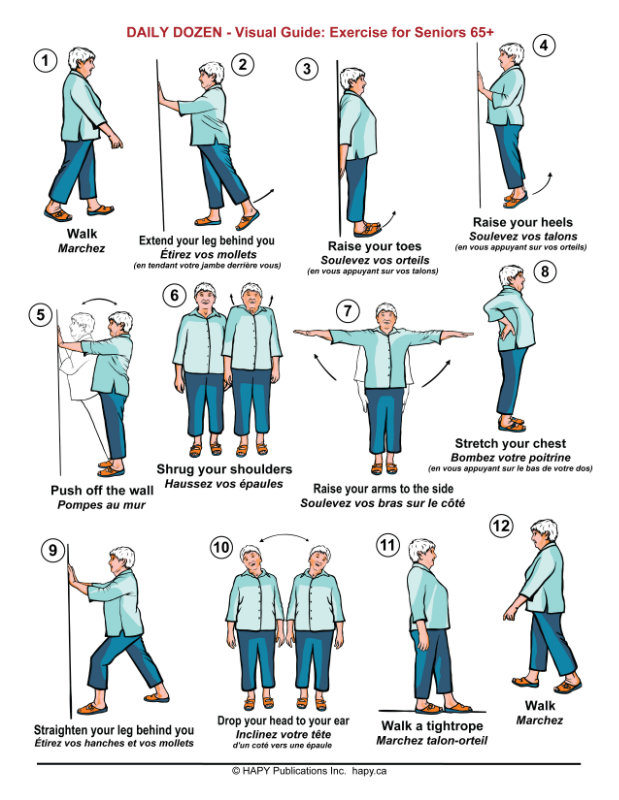
2. The second milestone was creating a visual aid, an exercise guide that would be simple and safe, yet addressing three most important elements of the exercise routine: balance, stretch and strength. We had the privilege of working on this project with a registered kinesiologist who decided what kinds of exercises should be included in this guide.
3. The third milestone was design; style, colour and fonts with seniors in mind. It is important that the design of the visual aid reinforces the message and this can be done only through testing different styles. The seniors chose the style and the management approved the quality, size and material.
Let’s talk about each of these in detail.
Milestones
✔︎ Research
Why was there a problem? We found that there are several reasons why seniors face social isolation and physical inactivity.
1. Most common reasons are
Lack of knowledge; sometimes seniors don’t know how, where and when to exercise.
Living conditions; like living alone, lack of access to the Internet, technology and language barriers, immobility or weather.
Lack of a common area at the entrance of the building.
2. Are there any solutions available?
There are many resources such as written publications and videos online but they are not available to people who lack access or knowledge on how to find them.
Many written publications don’t contain any graphics.
3. What was our solution?
Since we learned that seniors used hallways for their walking routine, our solution was to install a visual exercise guide on the hallway walls of a senior residence as a supplement to their walking routine.
It could be available to all seniors regardless of their ethnic background and skills or access to the Internet.
✔︎Creating Visual Aid
This project required several photo shoots with a model to make sure we got the right exercise set and it had to be done in steps:
Our kinesiologist made a list of exercises that could be used as a supplement to the walking routine.
The seniors decided what exercises they preferred.
The residence management had to approve these exercises for safety and liability.
Every exercise’s true representation had to be approved by the kinesiologist.
✔︎Design
We created examples of different designs so our seniors could pick their favourite and the management could approve it for installing it on the hallway walls. The design had many requirements:
The recipients were seniors who may not be able to read so they had to contain easy-to-understand illustrations.
The colour palette needed to be appropriate for the people it was meant for and the space.
Captions in a simple, large, clear font written in English and French, two official languages in Canada.
Small enough to easily print and install by the management but large enough to see the details by the seniors.
The visual aid could not become a reason to crowd a hallway.
12 posters illustrating 1 exercise per poster in a simple colour drawing with captions in 2 languages that could be spread on hallway walls of each floor in the senior residence.
It would serve as an interactive art where people could look at it and use it during their daily walking routine.
It needed to be done in more than one format to make sure it could serve all parties involved. I called this visual aid Daily Dozen: Visual Exercise Guide—for Seniors 65+. It was inspired by the Canadian Physical Activity Guidelines for Older Adults – 65 Years & Older which was available only online and only to those who would be able to search for it and who would be able to read it because it did not contain any graphics. I found it on the website of CSEPguidelines.ca.
Summary
The Creative Journey of the Daily Dozen began with a problem. We accomplished our goal of creating this visual aid through three milestones:
Research
Creating a visual aid
Design
This project took about a year to complete and it was only possible by the contribution of knowledge and time of many people.